
CosmoApps.online - online constructor of cross-platform web applications
"If you want to succeed - do not like everyone else!"

Development of a simple CosmoApps web application from scratch using no-code technology.
CosmoApps is a next-generation web and mobile application development system that allows using only a web browser to develop serverless cloud applications deployed in the Microsoft Azure cloud.
Unlike systems such as 1C Bitrix, the emphasis is on automating the process of developing the application interface and excluding, where possible, writing program code. An application is a set of descriptions of objects (documents) of the application and the application as a whole (menu structure, security system, etc.). Thus, to develop an application, you do not need to be a specialist in PHP or ASP .NET - basic knowledge of javascript is enough to develop the structure and interface of the application.
When developing an application, you do not need to operate not only with HTML tags, but even with individual web components - the CosmoApps system takes care of all the work here, while the developer concentrates on non-standard tasks.
Application data is stored in the Cosmos DB document database. The use of a documentary database provides the ability to store objects (documents) of an arbitrary structure - any correct JSON can be saved as a document and automatically indexed by all its properties (fields). Each application is allocated a separate section in the collection of documents, which allows you to work with data from a huge number of applications independently and without delay, while making optimal use of resources.
Example of a document created in the CosmoApps constructor and saved to the document database (0):
{
"_partitionId": "44974c3a-110a-3847-4433-5eacca353974",
"_type": "Order",
"DocDate": "2018-10-25T21:00:00Z",
"Number": "36708",
"Description": "Here is an order",
"Customer": {
"id": "14d2a985-5556-aea8-2a67-2ca2c9b7efc1",
"Name": "Animal farm",
"_type": "Firm",
"_defer": true
},
"Status": 0,
"Rows": [
{
"_type": "Row",
"Measure": 0,
"Amount": 224000,
"Price": 28000,
"Quantity": 8,
"Good": {
"id": "68b23788-84f4-5583-4a54-8e871ea218c7",
"Name": "Animal food",
"_type": "Good",
"_defer": true
},
"id": "d484332d-dbae-9984-f3d4-c47c7bdd81ae"
}
],
"id": "aae9bbce-4c80-3447-fe36-cd8bee004d15",
"_rid": "fwgfAMrYcKqRAQAAAAAAAA==",
"_self": "dbs/fwgfAA==/colls/fwgfAMrYcKo=/docs/fwgfAMrYcKqRAQAAAAAAAA==/",
"_etag": "\"9000884b-0000-0100-0000-5d92012e0000\"",
"_attachments": "attachments/",
"_ts": 1569849646
}
In the above example, it can be seen that data from other types of documents can be included (in whole or in part) within a document. This allows you to load and save an entire document without having to merge data from multiple tables, which greatly improves performance when retrieving data, although it reduces somewhat when saving changes.
"Customer": {
"id": "14d2a985-5556-aea8-2a67-2ca2c9b7efc1",
"Name": "Animal farm",
"_type": "Firm",
"_defer": true
}
Thus, the field Customer includes partial data of a document of type "Firm", which is indicated by the attribute "_defer", which means that the document is not fully presented. In such a situation, when accessing this property, CosmoApps will ensure that the entire document is downloaded from the server.
Let's develop an application that allows you to work with a database of documents of the specified structure.
Create an application
To create an application
1. Register on the portal http://cosmoapps.online or log in
2. Go to the app builder page http://cosmoapps.online/Account/Application
3. In the upper left corner, click the "+" button - add a project

4. In the window that opens, enter the name of your project and an optional explanation, then click "Create"

5. Your project has been created and will be saved to the project database. After clicking on the green button with the floppy disk icon (save all changes), you can start describing the application model.
Description of the application data model
According to the task, the application uses the following data:
-
Order – customer order
-
Firm – client firm
-
Good – a product ordered by a customer
-
Row – customer order row
Let's create records with the names of these documents in the "DataTypes" table:

Now we need to define the properties (fields) of these documents. To define the fields, open the branch of each document and add the "properties" properties:

The definition of the properties of the Row object should be considered separately, since it contains a reference to the Good object in the Good field:
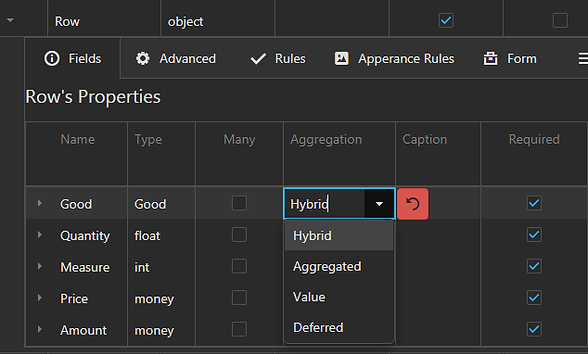
You should select the Good data type for the Good data field, which will indicate to the system that the field contains a link to a product. In order to store the product name in addition to the code in the document, you need to set the Aggregation property to "Hybrid", which indicates the need to store part of the data of this object (id and Name) in the string.
The unit of measurement in the Measure field is defined as an integer, but it would be more convenient to use a list of valid units. Since it is finite, we will not create a separate entity for it, but define a valid set of values through the enumerated type “Enumerations”, let’s call this type “MeasureUnitEnum” (the type name at the end says *Enum - so it will be easier for us to choose enumerables in the data types field later types) :

Now, in the description of the Measure field of the Row data type, you can replace the type with the newly created enumerated type:

Now let's move on to describing the fields of the Order object, the most complex of those presented in the application - the Customer field is a familiar hybrid reference to the Firm type, and for the order status (the Status field) we get another enumerated type OrderStateEnum:

The description of the "Order" object now looks like this:

It remains to embed strings into the Order object - a collection of objects of the Row type ("order" strings) and indicate to the system that these objects exist only within the order. “Many” means that there can be a lot of rows, “Aggregated” means that rows are stored directly in the order.

Adding objects to the menu
In order for our objects to be displayed in the adaptive menu of the application, we need to create menu items for them in the Navigation section:


For each model object, there are now several views - list (ListView) and detail (FormView) - menu items activate list views, from which you can open detailed ones for input and editing:

Adding a new order
Press the New button to enter the first order and fill in the fields:

As you can see, for all fields, depending on the data type, the system has created a corresponding type of control on the form. But we know that we have not yet introduced a single firm or a single product. This can be done without interrupting order editing:
Adding a Customer.

In the drop-down list of firms there is a button "New", which allows you to enter a firm directly from the order editing form and continue working with the order:

Click OK, the company has been added and assigned to the Customer field in the order.

A grid was also created on the form for entering order lines. Input of lines can be carried out both directly in the grid, and through the form for entering an order line. Let's use the form by clicking the "New" button above the grid (we create the first product in the same way as we did with the first company):

After clicking OK, we get the first row of the order in the grid:

Добавляем еще две строки по аналогии с первой:

After saving the order, we see "Order No. 1" in the list of orders.

You can also make sure that the directories of companies and products are also filled out:
Фирма "Первая"

Product directory “Good”:

Form Calculations: Default Values and Formulas
As could be replaced, many fields on the forms could be filled in automatically - for example, the current date, order status, the most likely value of the unit of measure of the goods.
The order line amount should also be calculated automatically.
Although forms can be written with various kinds of javascript routines, the simplest way to solve the problem is to use formulas.
Formulas are expressions in the javascript language that are evaluated when any data is changed on the form or when default values are substituted. Formulas for calculating field values can use other fields of the object to calculate the value, while formulas for default values do not have access to other fields, but can use custom or built-in functions (for example, the current user or the current date).
Define the default values (Default Value) and formulas (Formula) for order lines:
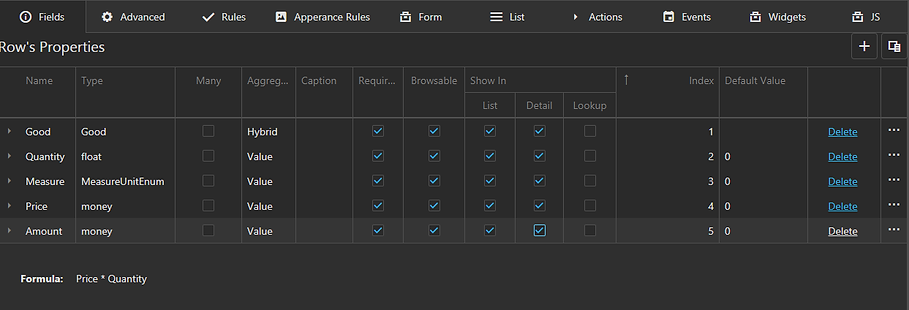
The simple Price * Quantity formula eliminates the need to manually calculate the line amount each time.
For an order, let's set the default values for the Draft status (0) and the formula for the current date for the OrderDate field (the Today() function returns the value of the current date):

Now on the form the fields for which default values are specified will be filled in automatically for a new document or a new order line.
